Welcome to my latest article, detailing encrypted backups in SQL Server 2014. In this article we'll be looking at the security employed to encrypt the backups and how to implement it. We'll also look at how it interacts with backup compression. For the purposes of this article the following apply,
| ACLs |
Access control lists, used to secure files on an NTFS filesystem |
| TDE |
Transparent Data Encryption |
| NTFS |
New Technology File System, the filesystem type used by Windows Server |
| OS |
operating system |
| SMK |
Service Master Key |
| DMK |
Database Master Key |
Previously the options available to secure database backups, unless you were using a 3rd party product, consisted solely of a backup media password and\or NTFS filesystem ACLs. However, the password option is more appropriate to prevent an accidental restore of an incorrect media rather than securing the backup from unauthorised users, as early as SQL Server 2005, Books Online has detailed the following,
For sometime now, although it really doesn't seem that long ago, we have been offered the ability to use Transparent Data Encryption (TDE) to protect the data at rest. This provided the ability to not only protect the raw database files, but also any backups that were created using the BACKUP DATABASE command. The problem with TDE is that when combining this with native compression, the compression was pretty much zero. The encryption negates the ability to compress the data.
Now there's a viable alternative, the media encryption option is a new feature in SQL Server 2014 and offers the ability to securely encrypt your backups as well as being able to utilise native compression, something which was not previously available natively.
How Does Encryption Work?
The encryption option in the BACKUP DATABASE command, when selected, uses an encryption algorithm to encrypt the backup. The algorithm options available are,
-
-
AES_128
-
AES_192
-
AES_256
-
TRIPLE_DES_3KEY
-
NO_ENCRYPTION
The algorithm in turn uses an encryptor, either in the form of a server certificate or a server asymmetric key. Both of these options are fairly similar, the certificate uses the CREATE CERTIFICATE command whereas the asymmetrical key uses the CREATE ASYMMETRICAL KEY command. Both utilise a public key and private key pair. The main difference is that an asymmetric key cannot be exported, it also does not have expiry options.
The default protection option for both these encryptors is via the database master key. If this key does not exist when attempting to create the encryptor, the command will fail and you will be asked to either supply an encryption password or create a database master key.
Since I've opted for protection by certificates, let's look at the creation process now, in order to create our certificate. On my new instance of SQL Server I first need to create a Database Master Key, I use the CREATE MASTER KEY command as follows:
CREATE MASTER KEY ENCRYPTION BY PASSWORD = 'P@ssw0rd1'
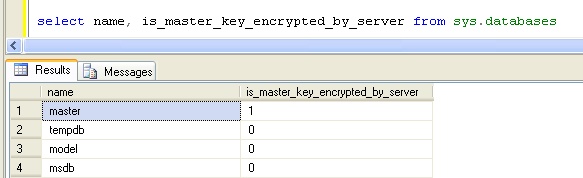
A quick check via the sys.databases catalog view shows the following, the master key is also encrypted by the Service Master Key and may be opened\closed automatically.
Note: This behaviour can be altered by dropping encryption by the SMK but this requires the DMK to then be manually opened\closed.
Now that we have our DMK created, we may create the encryptor in the form of a certificate. This is done using the following T-SQL:
USE master GO CREATE CERTIFICATE [MyNewCert]  AUTHORIZATION [dbo]
--ENCRYPTION BY PASSWORD = 'P@sswordt0encryptcert'
WITH SUBJECT = 'My New Certificate'
, START_DATE = '2014-01-01 00:00:00'
, EXPIRY_DATE = '2020-01-01 00:00:00'
Depending on how much you trust your administrators, to specify encryption by a password instead of the DMK uncomment the line above. Password protecting the certificate will restrict further who may backup and restore the certificate.
A quick check via the sys.certificates catalog view shows the following:
Note: the certificate is protected by the DMK

As soon as you have created the new certificate you must back it up immediately to avoid the possibility of data loss due to a missing certificate. The backup is created via the following T-SQL:
USE master GO BACKUP CERTIFICATE [MyNewCert] TO
FILE = 'E:\Bak\MSSQL12.INST1\MSSQL\Backup\MyNewCert.cer'
WITH PRIVATE KEY(
--DECRYPTION BY PASSWORD = 'P@sswordt0encryptcert',
FILE = 'E:\Bak\MSSQL12.INST1\MSSQL\Backup\MyNewCert.pky',
ENCRYPTION BY PASSWORD = 'P@sswordt0encryptcertbackup')
If you're extremely cautious and encrypted the certificate by a password uncomment the line above.
Backup The database
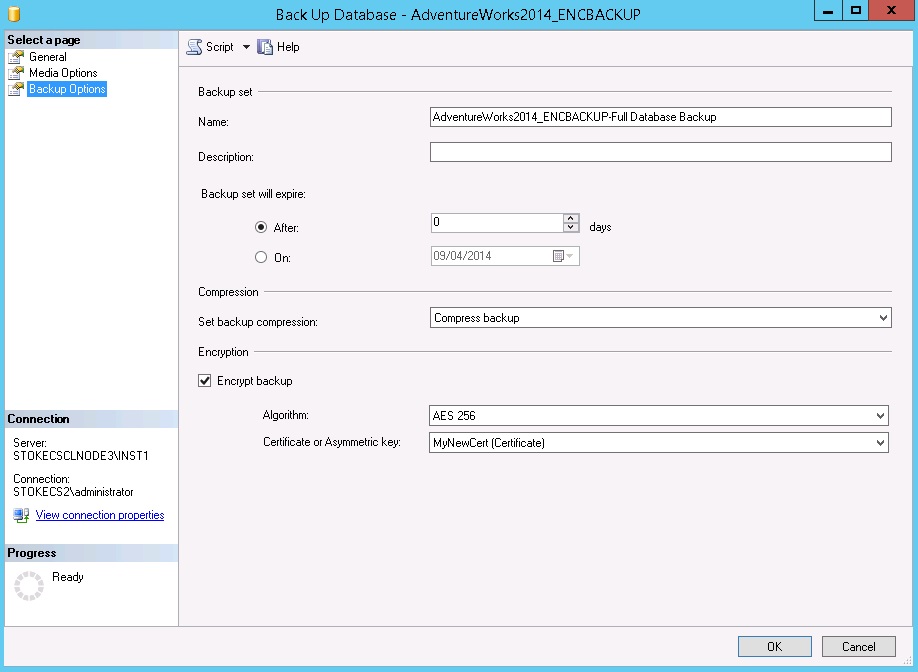
The backups may now be encrypted using T-SQL or you may use the backup GUI within SSMS. To backup via the GUI, see the screenshots below
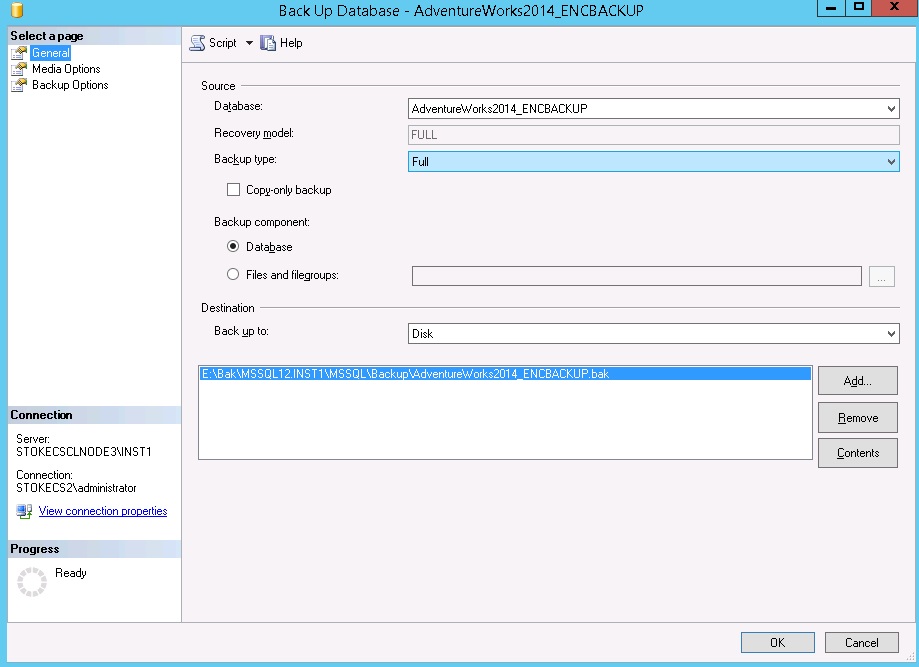
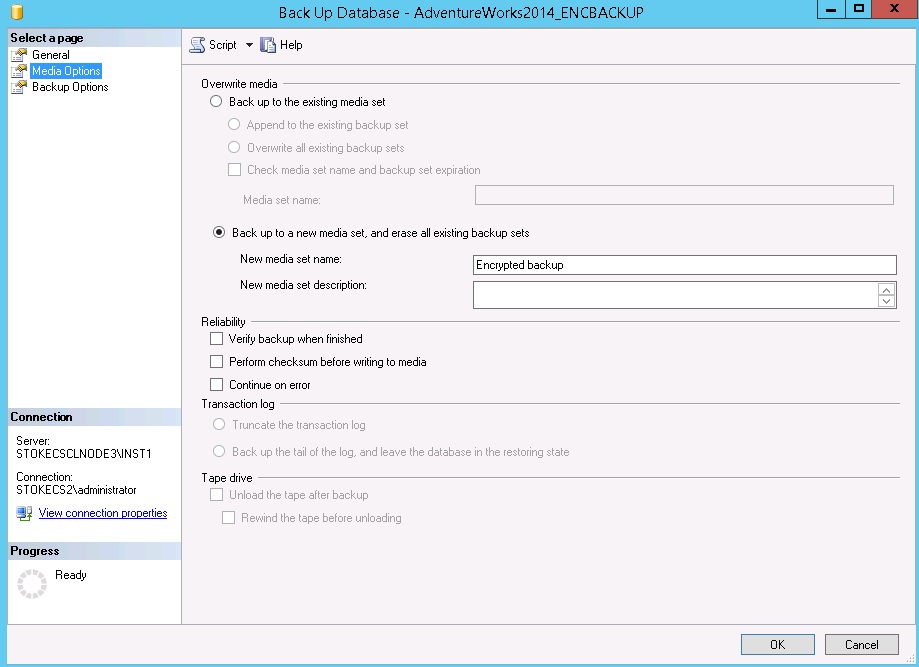
On the media options, you must specify a new media set to use backup encryption,
On the backup options page the "Encrypt backup" option is available.
Note: if you do not create a new media set, the encrypt backup option will be greyed out!
Alternatively, to backup via T-SQL use the following command
BACKUP DATABASE [AdventureWorks2014_ENCBACKUP] TO
DISK = N'E:\Bak\MSSQL12.INST1\MSSQL\Backup\AdventureWorks2014_ENCBACKUP.bak'
WITH INIT, MEDIANAME = N'Encrypted backup'
NAME = N'AdventureWorks2014_ENCBACKUP-Full Database Backup',
COMPRESSION, ENCRYPTION ( ALGORITHM = AES_256, SERVER CERTIFICATE = [MyNewCert] )
GO
Restore The Database
What happens when we want to restore our backup to another server, let's imagine for a moment we are going to create an AlwaysOn group and we are using these backups to initialise the secondary database(s) on our new instance(s). If you attempt to restore the backup immediately via the GUI you will see the following screenshot. There's an error but it's not helpful.
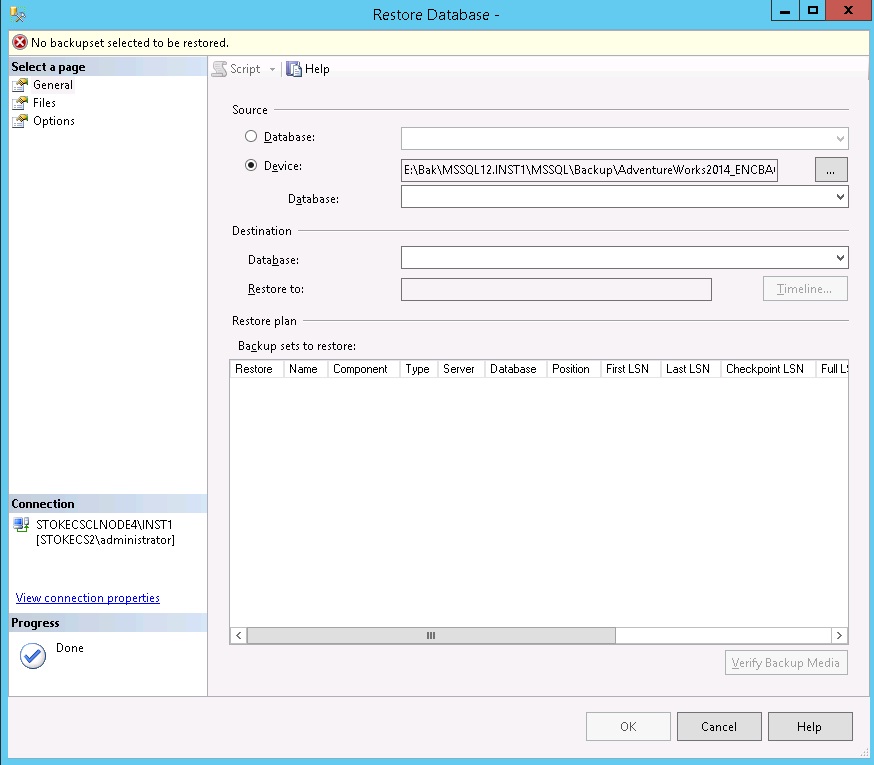
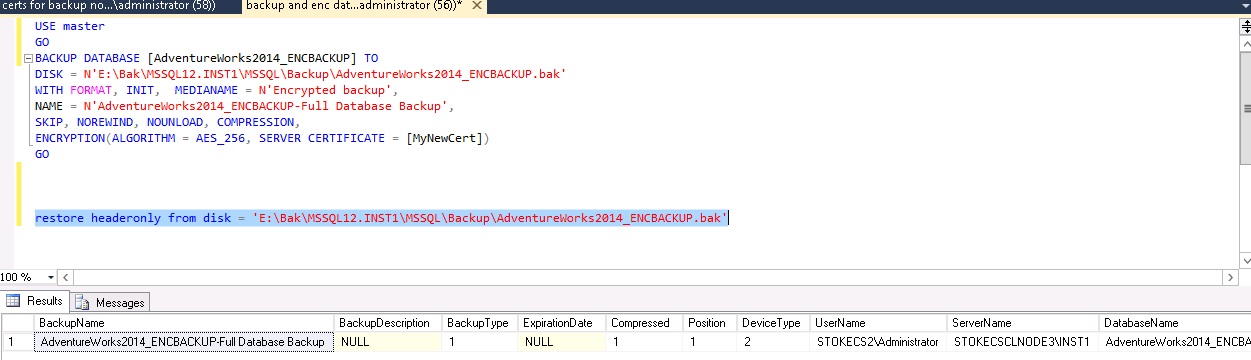
An attempt to read the backup header also produces an error, more meaningful this time.

We need to create the certificate on each instance where we intend to restore the database. This is done by copying the public key and private key certificate backups that were taken previously, to a location accessible by the new instance and issuing a CREATE CERTIFICATE command from a file. You must also create a Database Master Key on the new instance if it doesn't exist already.
The DMK does not have to match the source instance, they have no dependency on each other.
The following T-SQL shows how to create the certificate from a file on the new instance
CREATE MASTER KEY ENCRYPTION BY PASSWORD = 'Someseccurepassword'
GO CREATE CERTIFICATE [MyNewCert] AUTHORIZATION [dbo]
FROM FILE = 'E:\Bak\MSSQL12.INST1\MSSQL\Backup\MyNewCert.cer'
WITH PRIVATE KEY (
DECRYPTION BY PASSWORD = 'P@sswordt0encryptbackup'
, FILE = 'E:\Bak\MSSQL12.INST1\MSSQL\Backup\MyNewCert.pky'
--, ENCRYPTION BY PASSWORD = 'P@sswordt0encryptcert'
)
When restoring the certificate backup, if you wish to encrypt by password, uncomment the line above.
A fresh attempt at reading the backup header shows us the certificate has been correctly installed.
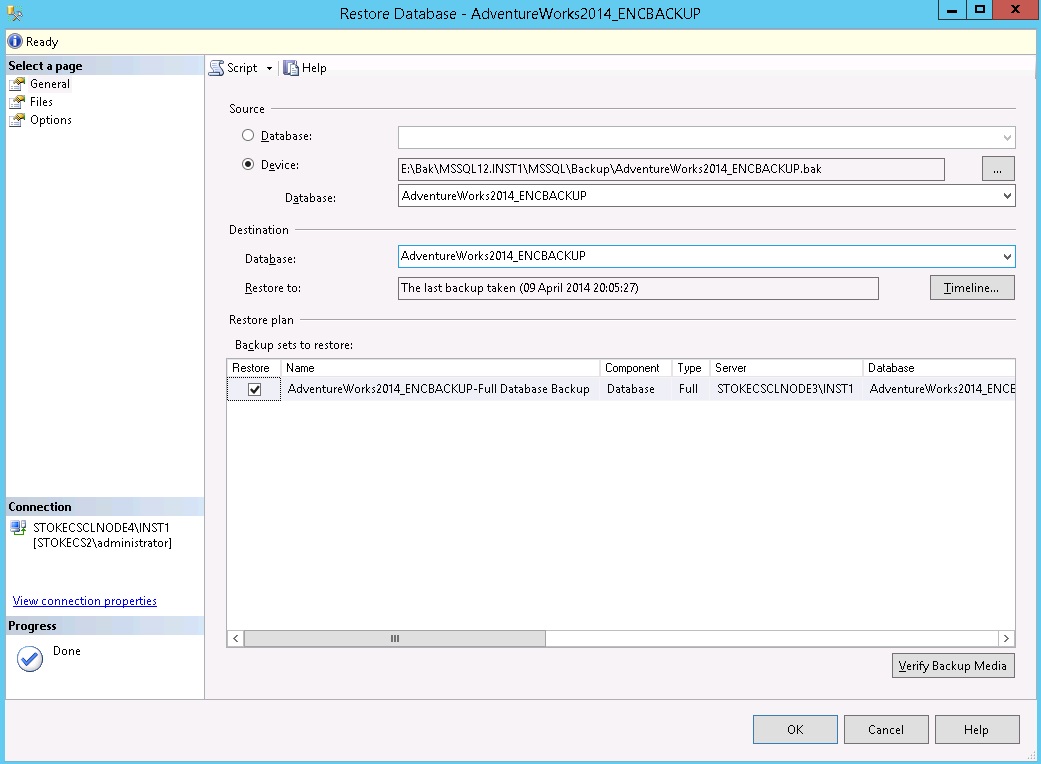
The restore via the GUI is now possible.
Effects of Encryption on Compressed Backups
To test the effects I took three backups. Backup A used no compression or encryption. Backup B used compression only. Backup C used compression and AES256 encryption. The results were as follows;
| Backup Name |
Time Taken (secs) |
Size (MBs) |
| Backup A (none) |
11.88 |
190 |
| Backup B (compressed) |
3.66 |
44.5 |
| Backup C (compressed\AES 256) |
3.62 |
44.5 |
Finally, SQL Server now offers the ability to encrypt your data alongside using efficient compression. Whether or not they will rival popular 3rd party backup products remains to be seen, but at least in native mode you can be sure your data is both stored efficiently to conserve space and is safe from prying eyes. Just ensure you manage the certificates correctly and any passwords used to secure them. Have fun and as always, if you have any questions, send me an email and I'll help all I can.
 Subscribe