Anybody who has worked with High availability for SQL server over the years, will be fully aware of Microsoft Cluster Services (Windows 2003) and Windows Server Failover Clusters (Windows 2008). With a clustered environment we are able to fully mitigate failures by utilising
- multiple network cards for network redundancy
- new Majority node set quorum models (available in Windows server 2003 SP1 onwards) to remove the disk dependency and increase support for multi site clusters.
- multiple computer nodes to negate core node hardware failure (i.e. motherboard, etc)
The only real weak link in the chain is the shared storage. There are many ways to achieve redundancy here, but it usually comes at significant cost and it is often difficult to setup and maintain. Of course, as previously mentioined, a fail over cluster only mitigates the server hardware, it does not provide a single or even multiple secondary databases. We have database mirroring in SQL Server versions prior to SQL Server 2012, but these only provide scope for a single nonreadable (with the exception of snapshots), secondary database. You can combine other SQL server availability technologies with fail over clusters, but think of the increased complexity.
Well, AlwaysOn is the new high availability feature from Microsoft in SQL Server 2012. AlwaysOn takes the old database mirroring concept and creates a whole new level of HA, this encompasses the following;
-
No shared storage, each server\instance has localised storage and removes the storage Single Point Of Failure.
-
AlwaysOn listener service to accept centralised requests to HA database groups.
-
Multiple availability databases instead of the traditional Principal\Mirror scenario.
-
Better failover functionality leveraging Microsoft Windows Server Failover Clustering.
-
The ability to suspend data movements at the primary level or individual secondary level.
-
Support for multiple IP subnets.
-
Offload backup and maintenance operations to secondary databases.
By offloading backup operations to read only replicas, you can reduce the I\O requirements on your production systems. Multiple secondaries can also provide DR and reporting replicas.
AlwaysOn uses the concept of Availability Groups and these may contain one or more databases that you wish to enable for HA. There are a set of strict pre requesites that must be satisfied before a database may participate in an Availability Group, these are fully detailed at the following link.
http://msdn.microsoft.com/en-us/library/ff878487
AlwaysOn still uses the familiar SQL server endpoints for instance to instance communication, you may also create a highly available listener service which you will use to accept incoming connections to the availability group. The listener consists of a unique IP address and a unique virtual network name, this is by far one of the most significant changes in making the groups databases highly available. By providing a centralised access point into the availability group, clients are removed from the issues that are generated during failover of a database. Availability group replicas may also be configured for read-only routing, this allows online readable secondaries to handle read only requests removing concurrency issues from the primary replicas.
With AlwaysOn you still also have the traditional synchronous and asynchronous modes that were used in database mirroring. Asynchronous replicas support manual failover only while Synchronous replicas support automatic or manual failover.
When attempting to setup AO groups there are a range of options for troubleshooting any errors. You have the AlwaysOn dashboard and also the SQL Server and Windows logs. The wizard driven deployment offers the easiest deployment route, whereas manual deployment requires a lot of manual interraction. Despite this, AO groups are still extremely easy to deploy and configure and offer a level of HA that was previously not available without resorting to complicated levels of feature integration.
Creating Your Own AlwaysOn Group
The availability group may be created and configured via the wizard or manually. Manual interraction is not as streamlined as the wizard, for this reason you may want to use the wizard as your main deployment method. When using the wizard you have the option of scripting the process much in the same way as you can when performing other actions within SQL Server.
To setup and configure a virtualised SQL Server 2012 Always On complete system you will need the following
-
A physical host machine with your favourite Hypervisor installed (I use VMWare Server 2.0.2).
-
Windows 2008 R2 Enterprise
-
SQL Server 2012 Enterprise
Optional: You may use Windows 2008 R2 Standard edition for your Domain Controller instead of Enterprise edition.
The first tasks are to create the required virtual machines, these are
1 x Windows 2008 R2 domain controller (Standard or Enterprise)
2 x Windows 2008 R2 cluster nodes
If you require any help in creating these, please see my previous guide starting at the following link for help with VMWare server and creating the VMs, etc.
http://www.sqlservercentral.com/articles/virtual/72682/
For my VMs I have used the following network configurations
| Node |
Network |
IP Address |
| Windows 2008 R2 DC |
Public |
192.168.0.40 |
| Windows 2008 R2 SQLHANode1 |
Public |
192.168.0.42 |
| |
Private |
192.168.93.42 |
| Windows 2008 R2 SQLHANode2 |
Public |
192.168.0.43 |
| |
Private |
192.168.93.43 |
All of the VMs will use local virtual disks, no shared storage, this will replicate the scenario required for the AlwaysOn high availability. Once you have all the VMs created, networked and updated you may now install your stand alone SQL Server instances to each of the 2 nodes. SQLHANODE1 has a named instance "INST1" and SQLHANODE2 has a named instance "INST2". Once the instances have been installed and are operational, proceed to the instructions below.
Create the Windows Server Cluster.
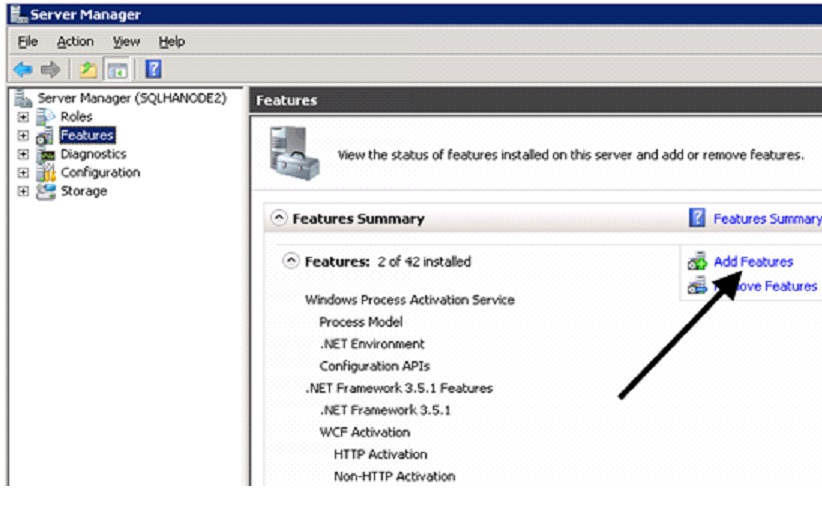
Before going any further it is necessary to install the Failover Cluster feature. Add the fail over cluster feature by opening the Server Manager console and select "Features" and then "Add features" as shown below. Step through the wizard to complete the installation, do this for each of the 2 nodes and close server manager once you have completed.
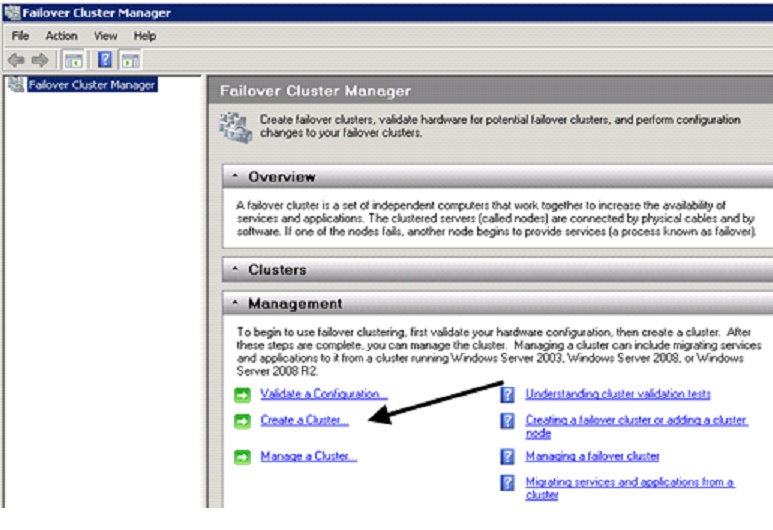
Once the feature has been installed to both nodes the cluster installation is performed as follows;
Open the failover cluster manager console and click "Create a cluster".
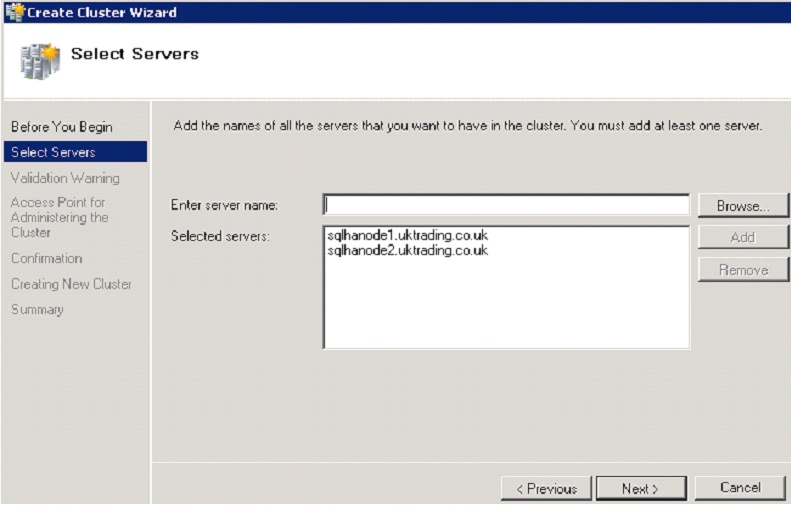
Click "Next" at the first screen and then at the following screen below, select the servers that will participate in the new cluster and click "Next"
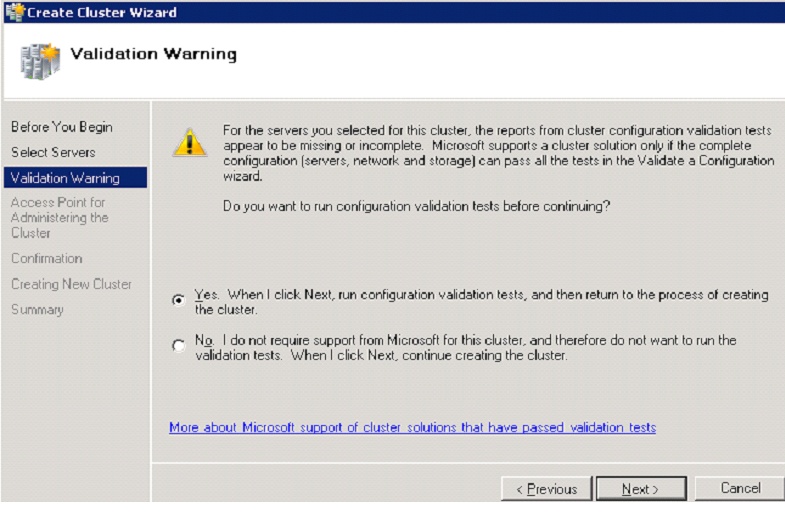
Select the option to run the tests and return to the create cluster process, then click "Next"
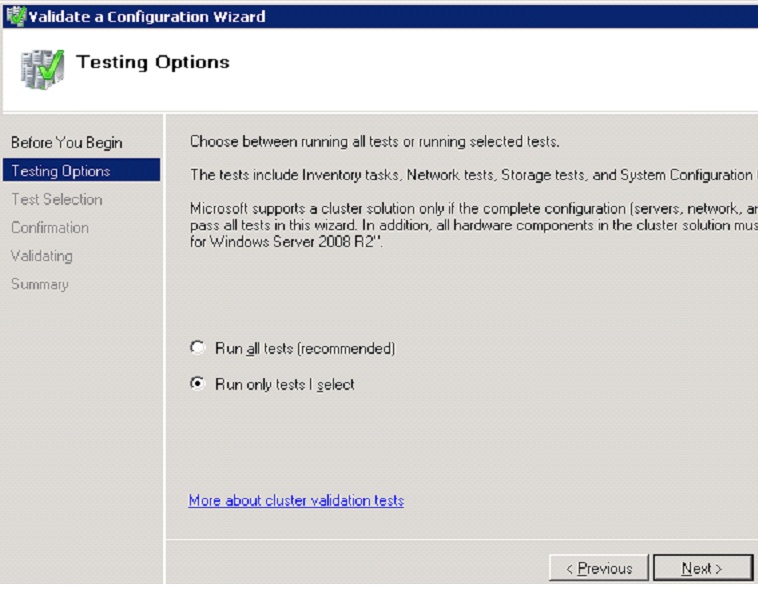
Step through the wizard until you see the screen below, select "Run all tests (recommended)" and click "Next".
The wizard will find all local drives and mark them as non shared disks.
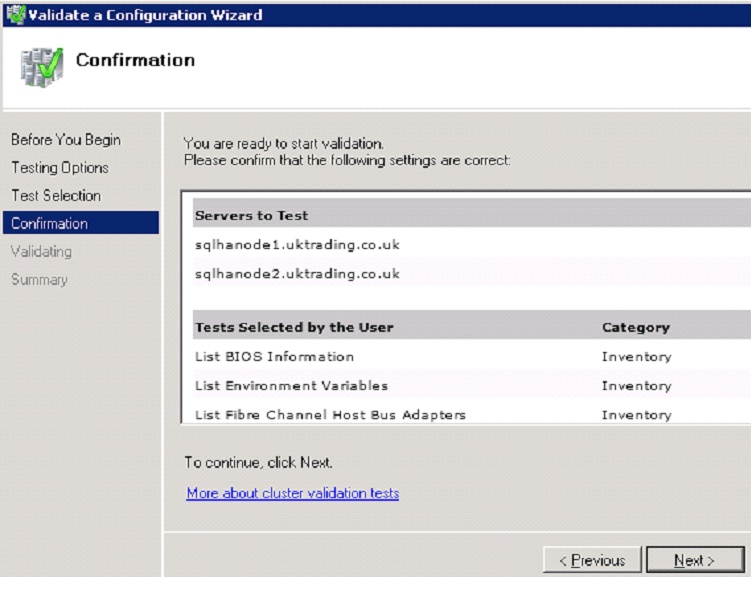
You should now be asked to confirm and start the validation, Click "Next"
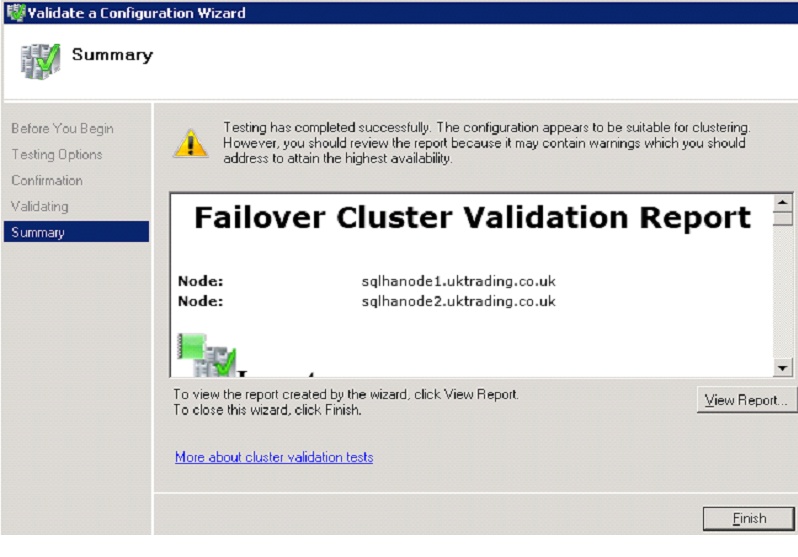
Once the tests have completed successfully, click "Finish" as shown below. Review the validation report if necessary.
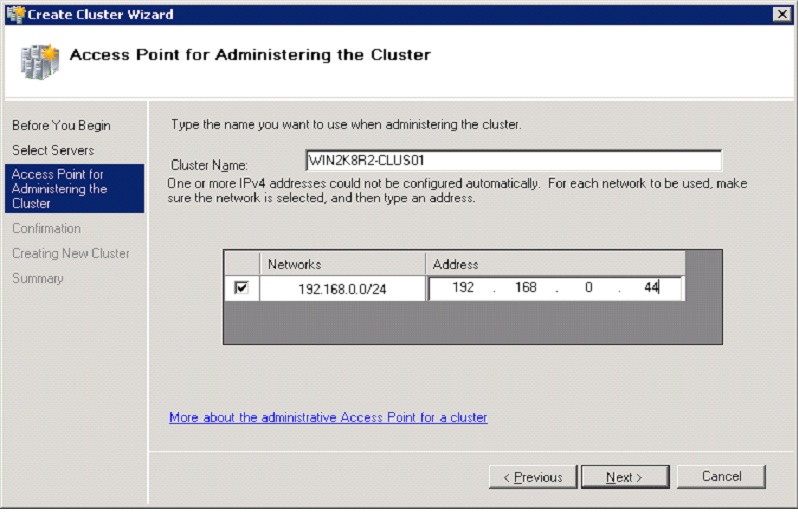
You will then be taken to the "Create Cluster" wizard, supply the virtual networkname and IP and click "Next"
Confirm the cluster entry point details and click "Next" to continue at the confirmation screen.
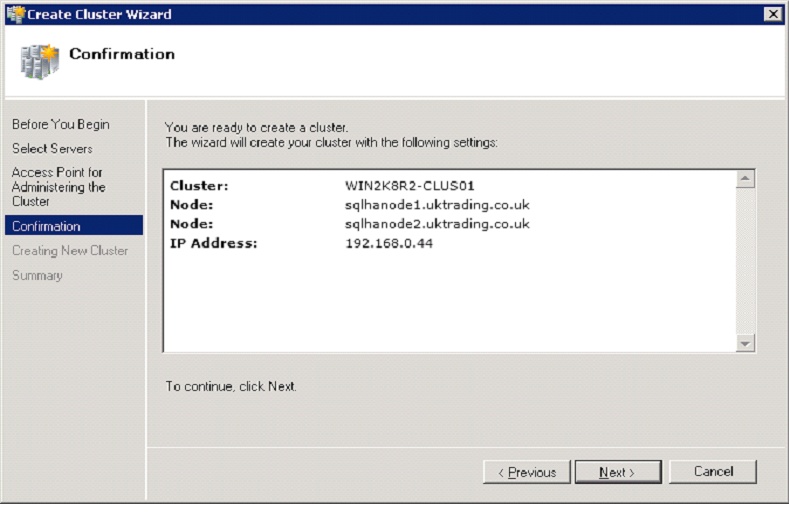
When the wizard completes click "Finish" to create the cluster.
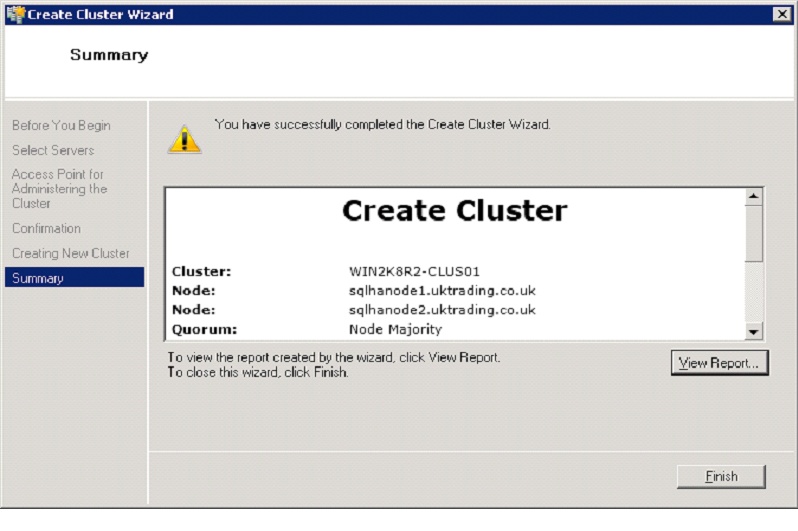
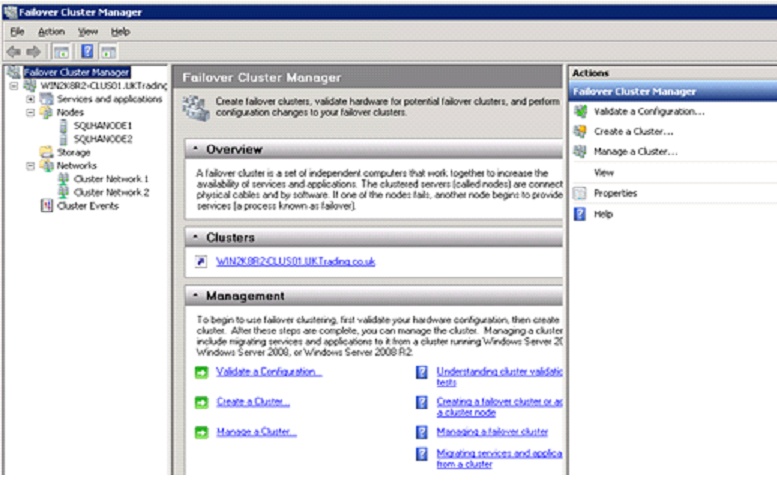
You have now created the base Windows Server Failover Cluster.
Any attempt to access the AlwaysOn features in Management Studio with first completing the configuration will result in the error below.
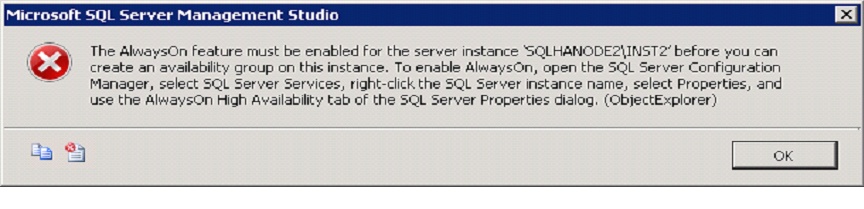
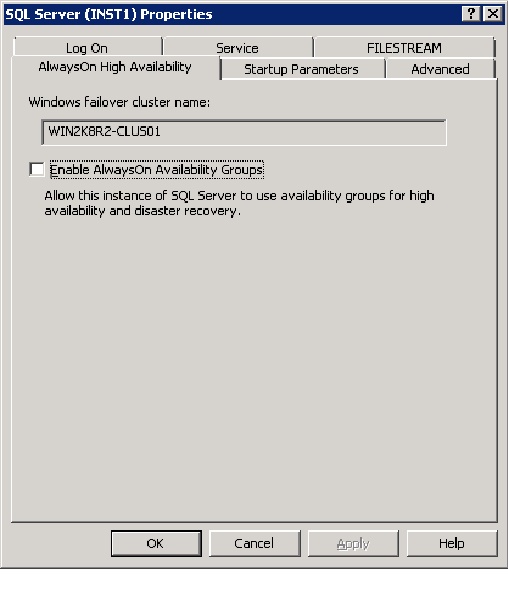
Open the SQL Server Configuration manager tool and under "SQL Server Services", right click the service you wish to configure for AlwaysOn. You will see the dialog below, check the "Enable AlwaysOn Availability Groups" checkbox and click "OK". You will need to restart the service.
Deploy A New Availability Group Using the Wizard
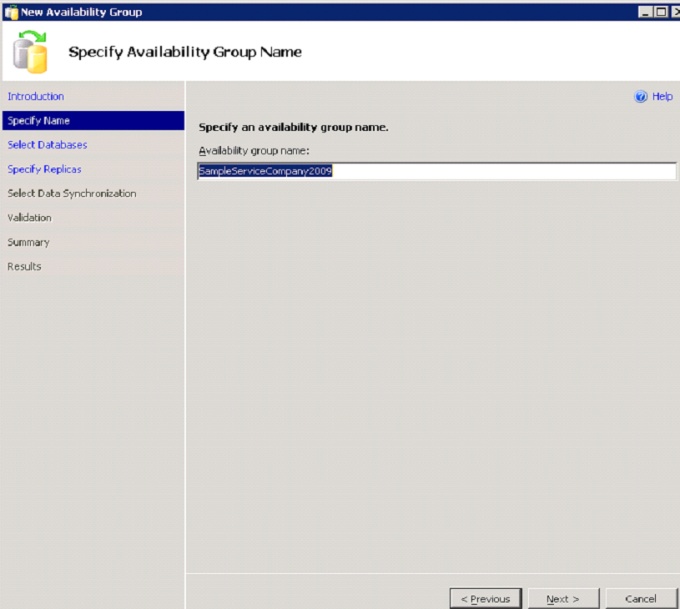
Now we have AlwaysOn enabled we can start to configure a new group, righ click "Availability Groups" and select to create a new group. The new availability group wizard starts as shown below, supply your group name and click "Next".
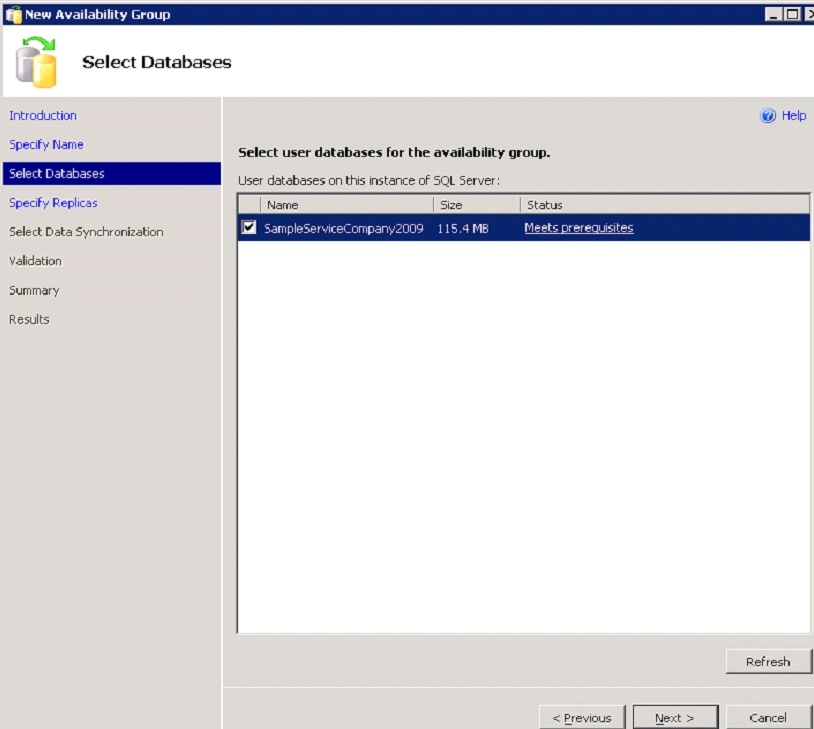
Select the database(s) to participate in the AlwaysOn group and click "Next".
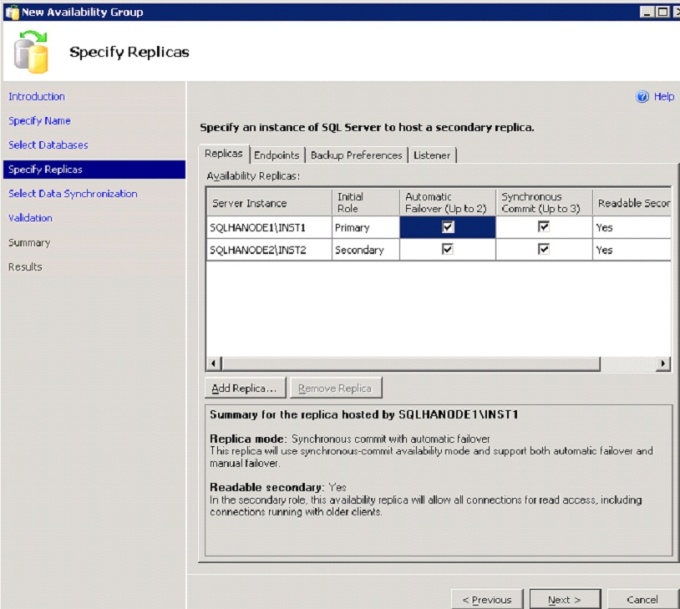
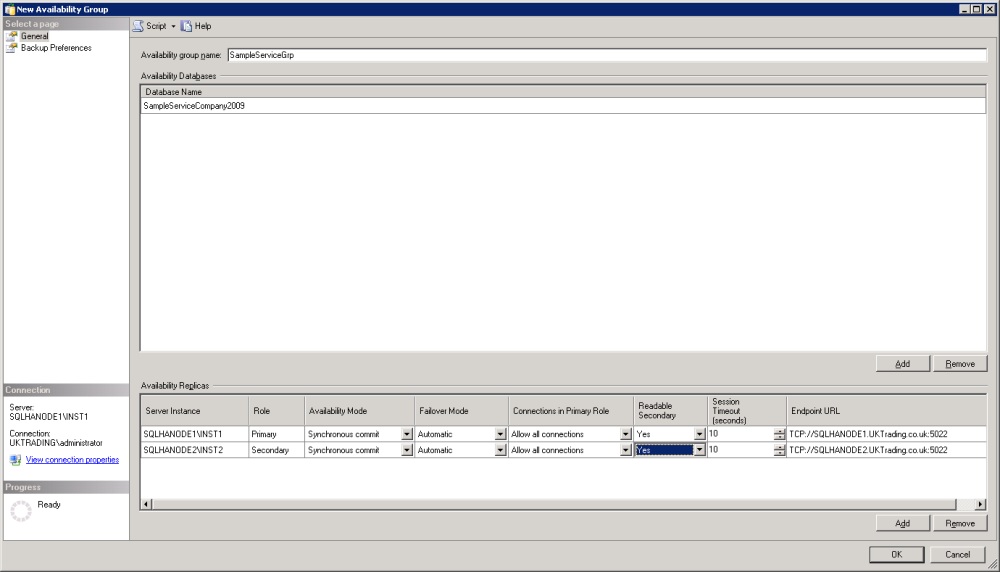
Specify the Availability Replicas and move to the "Endpoints" tab. Check the endpoint configuration and move to the "Backup Preferences" tab.
Specify the backup preferences and move to the listener tab.

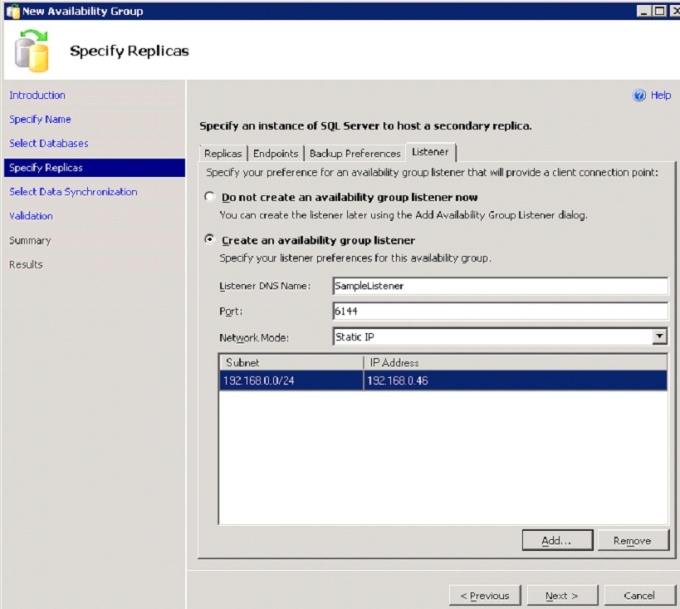
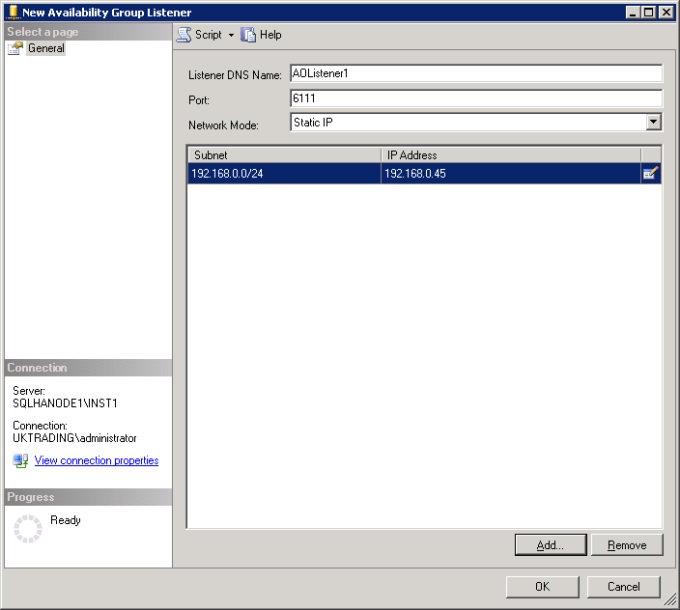
Provide details of the Listener IP, TCP port and network name, then click "Next".
Select your synchronisation preference and click "Next"

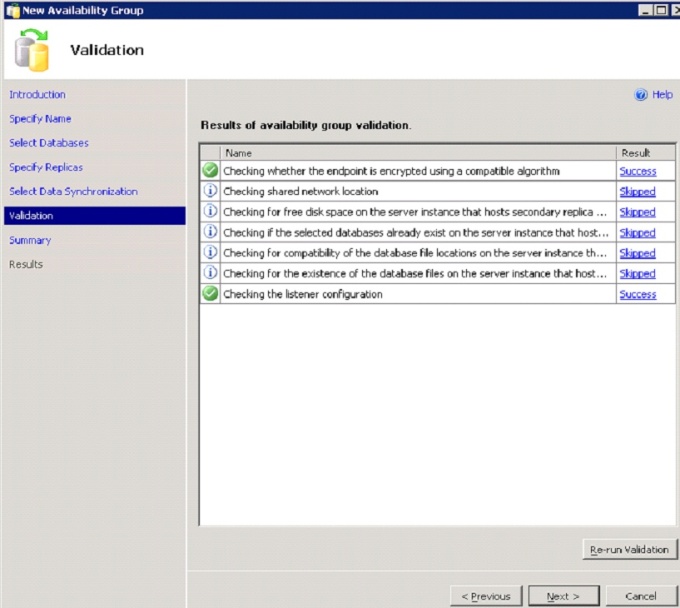
Check the validation screen and click "Next".
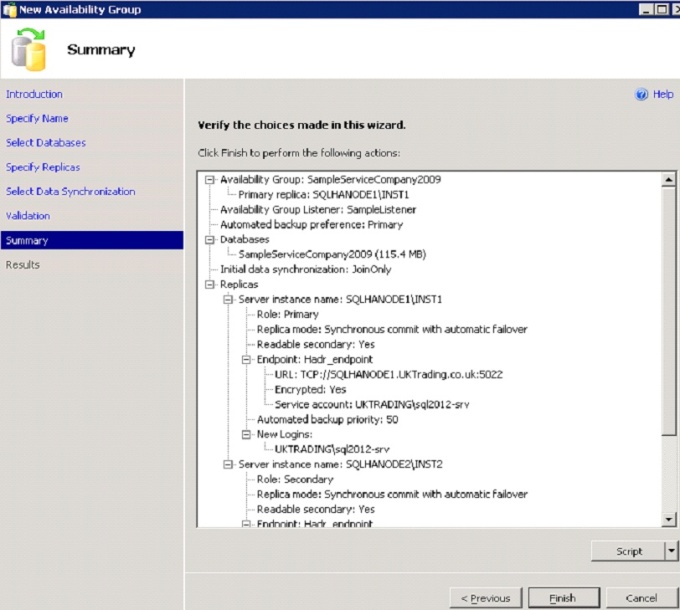
Review the summary and click "Finish".
Once the wizard finishes, click close.
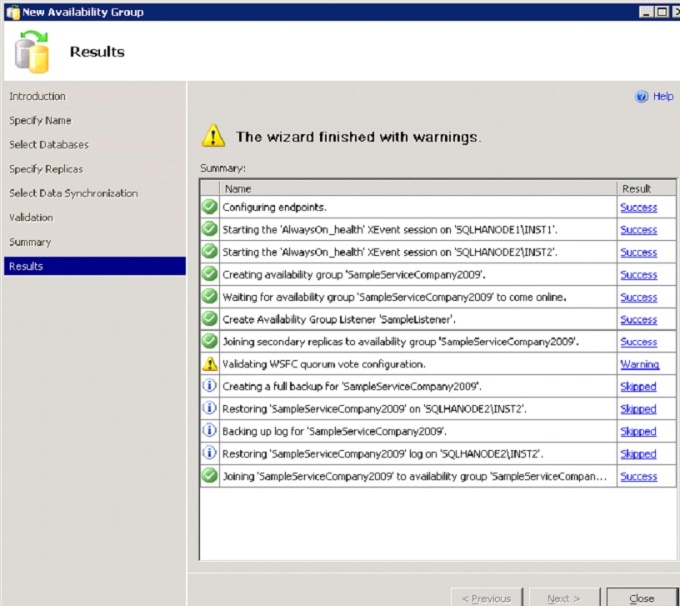
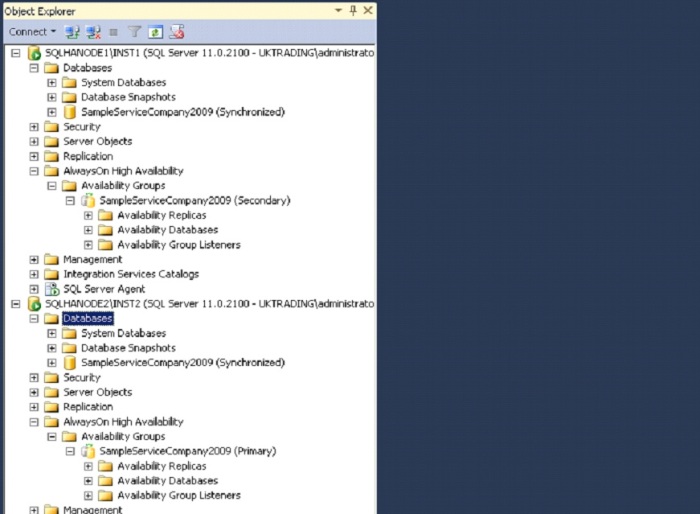
New Availability Group deployed, configured and synchronised.
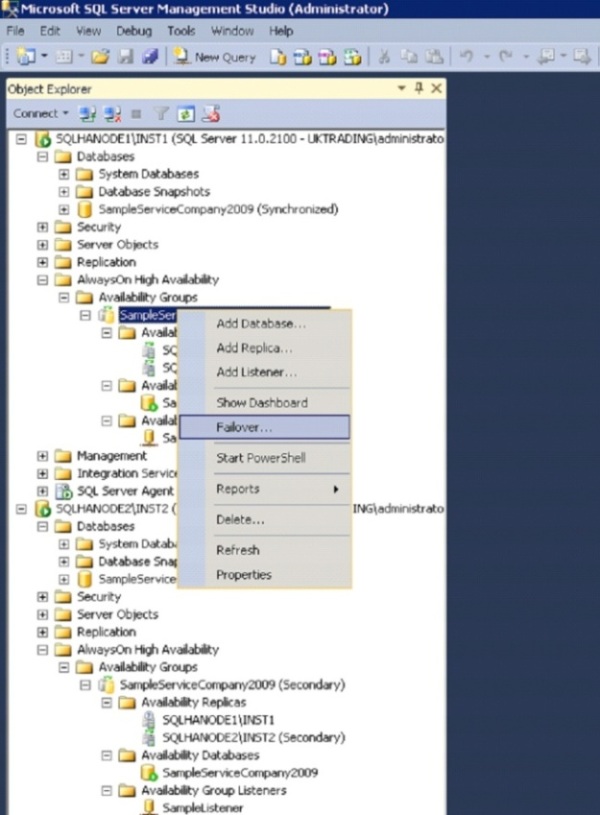
Manually Failover The Availability Group
To manually failover the new group, right click the group and select "Failover".
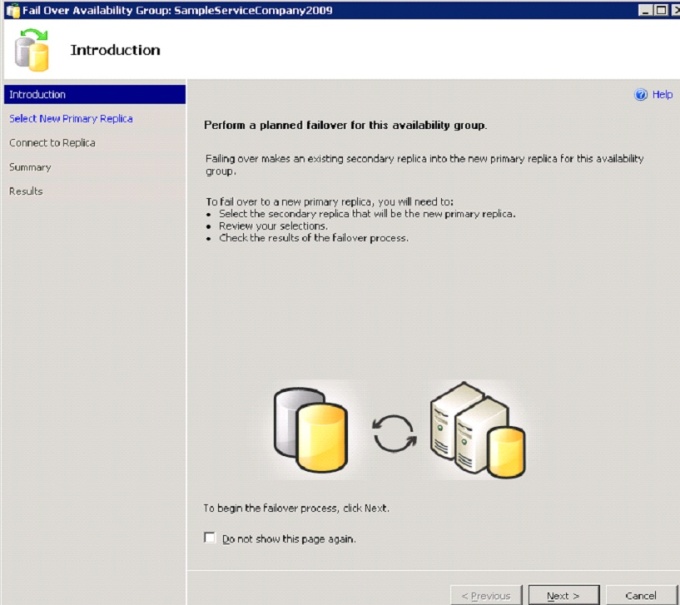
Click "Next" at the failover wizard welcome screen.
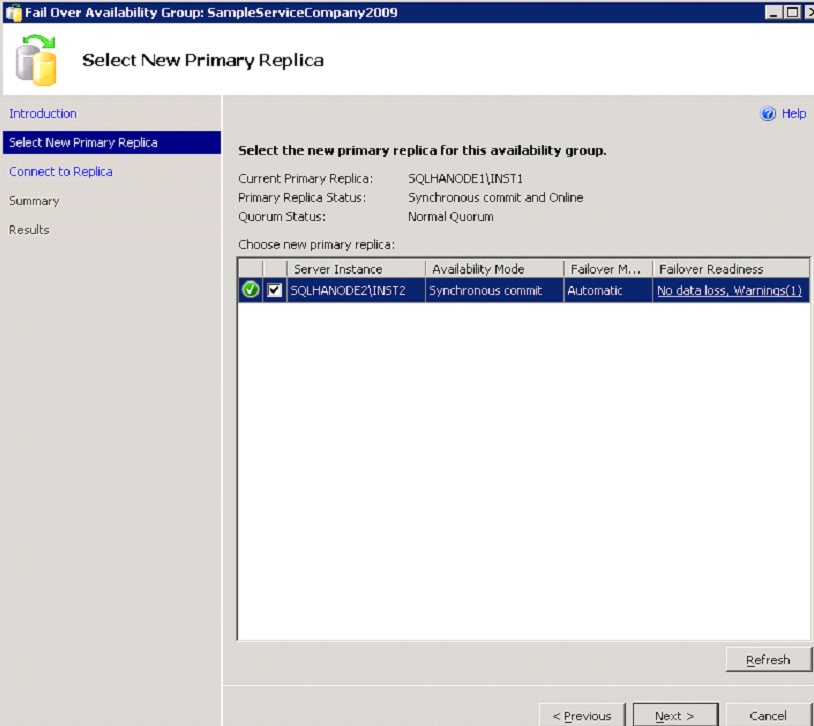
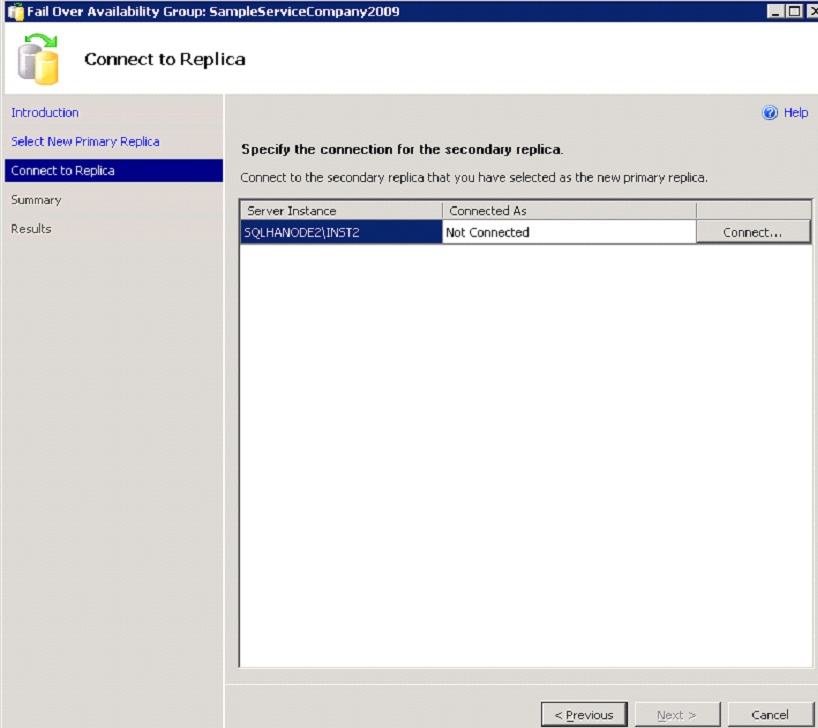
Select the new Primary replica and click "Next".
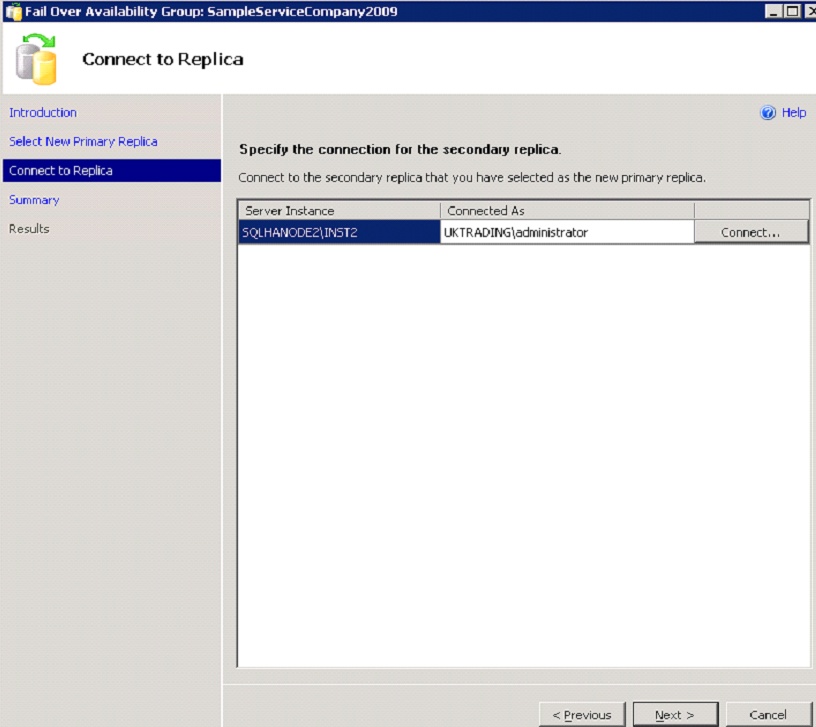
Connect to the new Primary replica.
Connected so click "Next".
Review the summary screen and click "Finish".
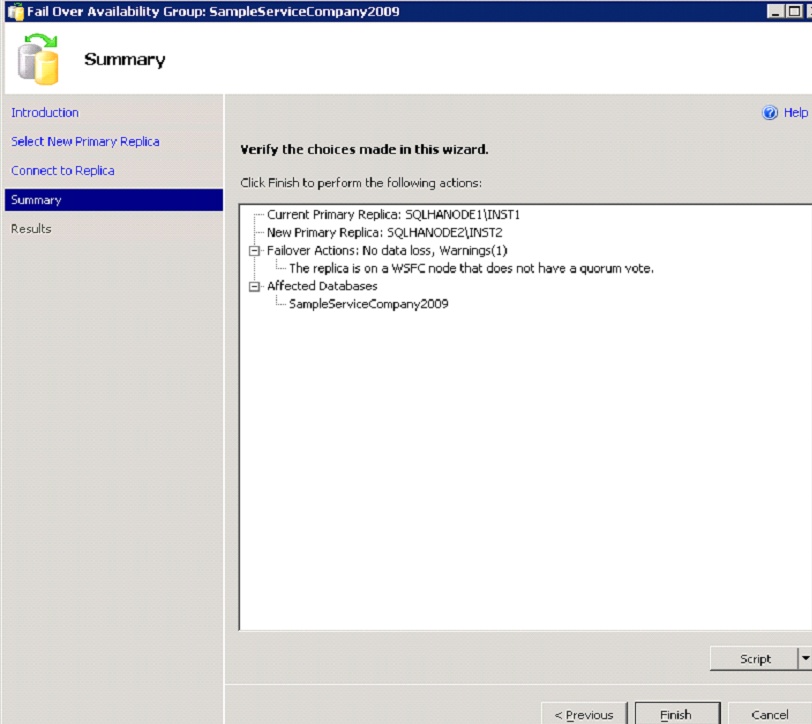
When the wizard finishes click close.

Manually Deploy A New Availability Group
If this is the first time you are creating an AlwaysOn availability group on your instance and you are performing the action manually you need to perform the following first.
CREATE ENDPOINT MyEndpoint
    STATE = STARTED
    AS TCP ( LISTENER_PORT = 5022 )
    FOR DATA_MIRRORING (AUTHENTICATION = WINDOWS NEGOTIATE,
       ENCRYPTION = SUPPORTED, ROLE=PARTNER);
GO

GRANT CONNECT ON ENDPOINT::MyEndpoint TO [domain\account]
GO
Failure to create the endpoints first will stop the specified replicas from joining to the availability group.
To manually deploy an Availability Group without using the wizard, right click "Availability Groups" and select "New availability group" then use the following steps.
Provide a group name and also add in any databases you wish to include. Alongside your Primary replica (the instance you are adding the group on), enter the details of one or more secondary replicas (SQL Server instances you wish to act as secondaries), including the mirroring endpoint URL. Once you have populated these details switch to the "Backup Preferences" page.
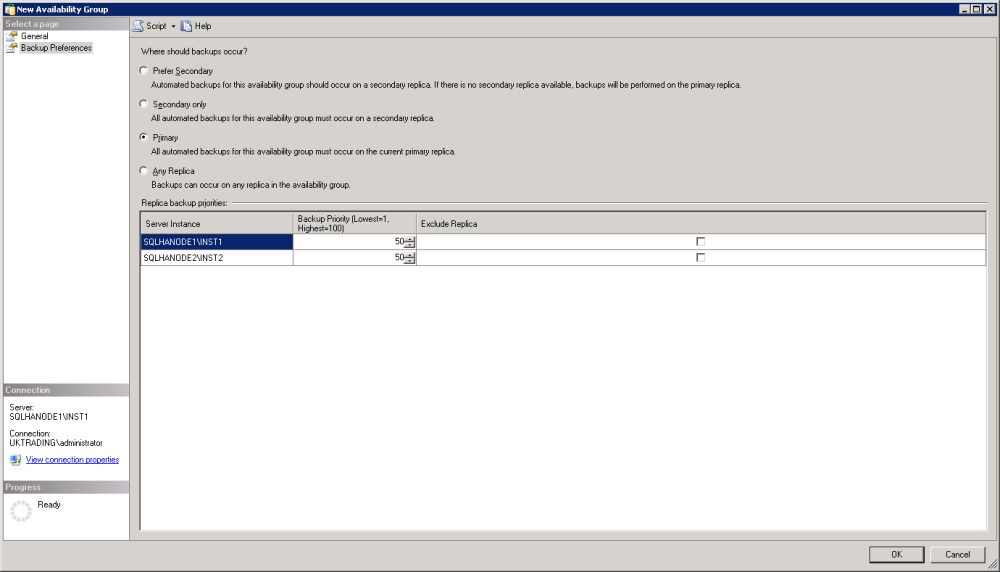
Select your backup preferences and any replica backup priorities and click "OK".
Expand the new AO group and right click availability group listeners and select "Add Listener".
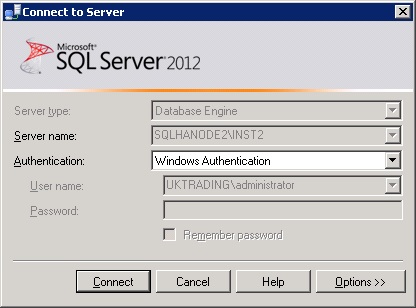
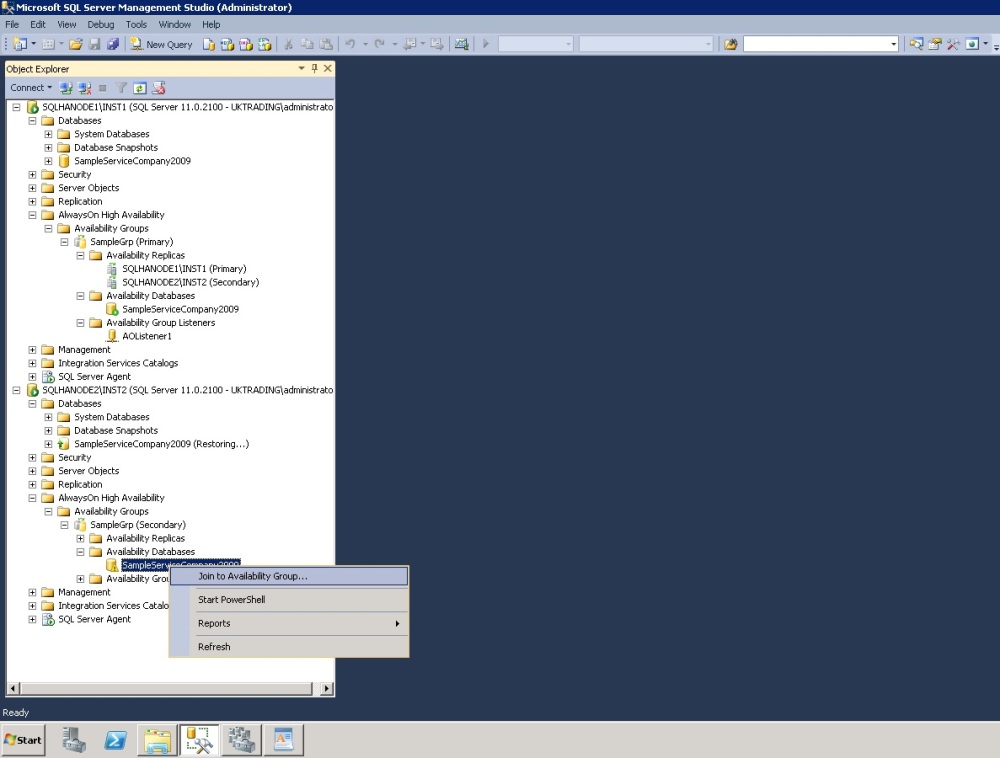
Right click the partner node (identified by the red stop icon) and select "Join to availability group".

Connect to the instance
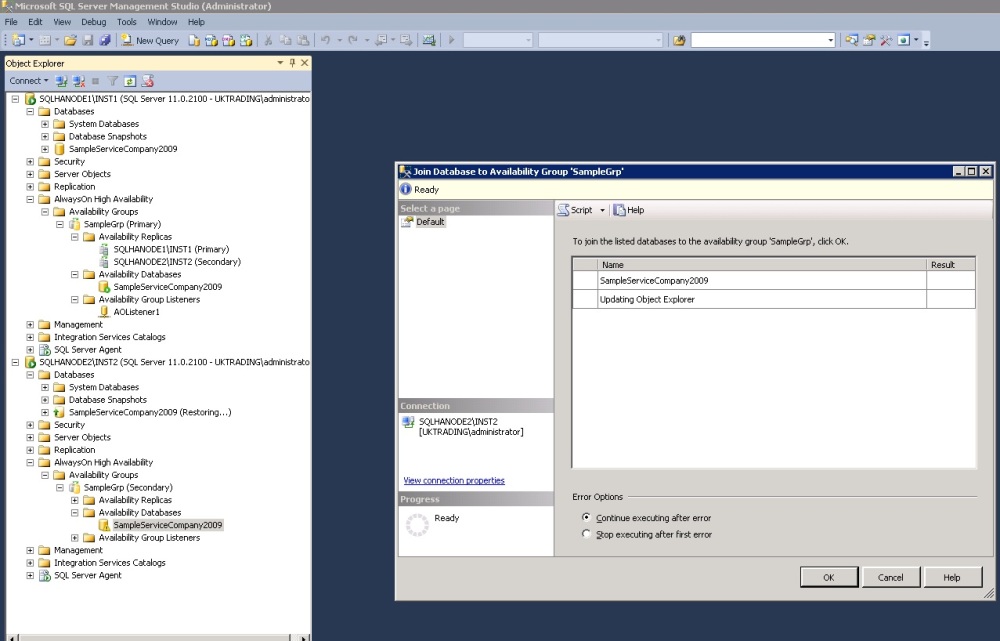
Click "OK" to join the group
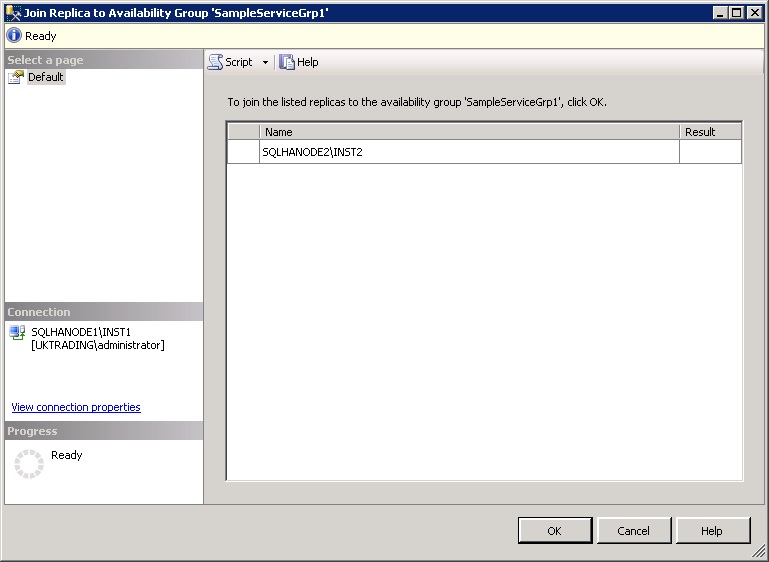
The secondary replica has been joined to the AO group.
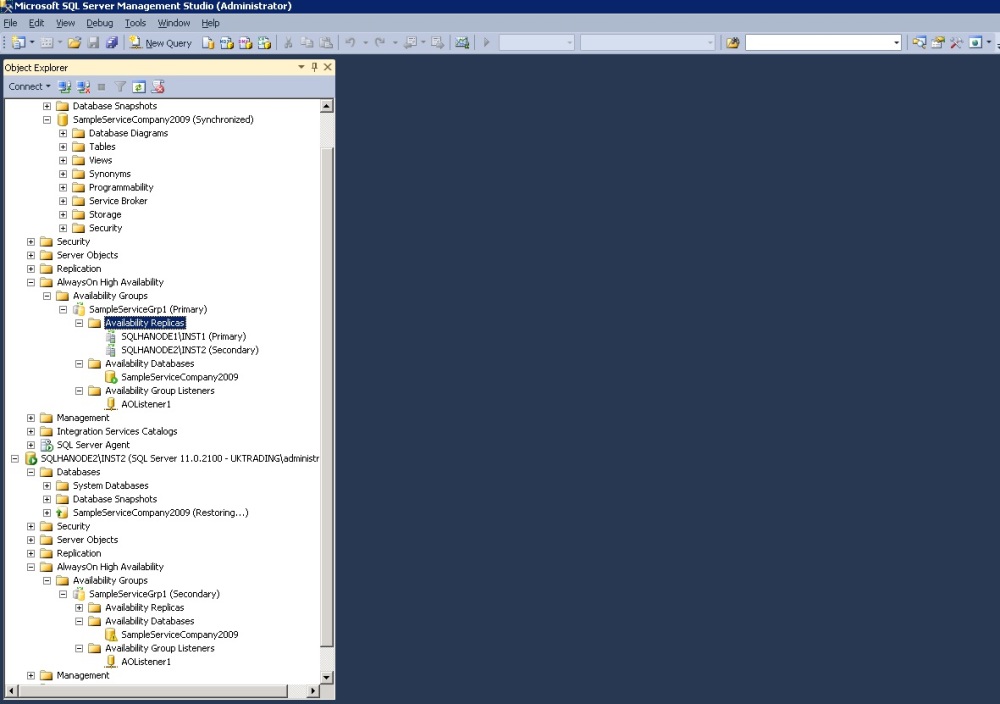
Open the secondary instance and move to the availability group details. Right click the secondary database (with yellow warning triangle icon) and select "Join to availability group".
Click "OK" to continue,
If successful, the secondary database should change to the familiar Microsoft green facing right arrow icon.

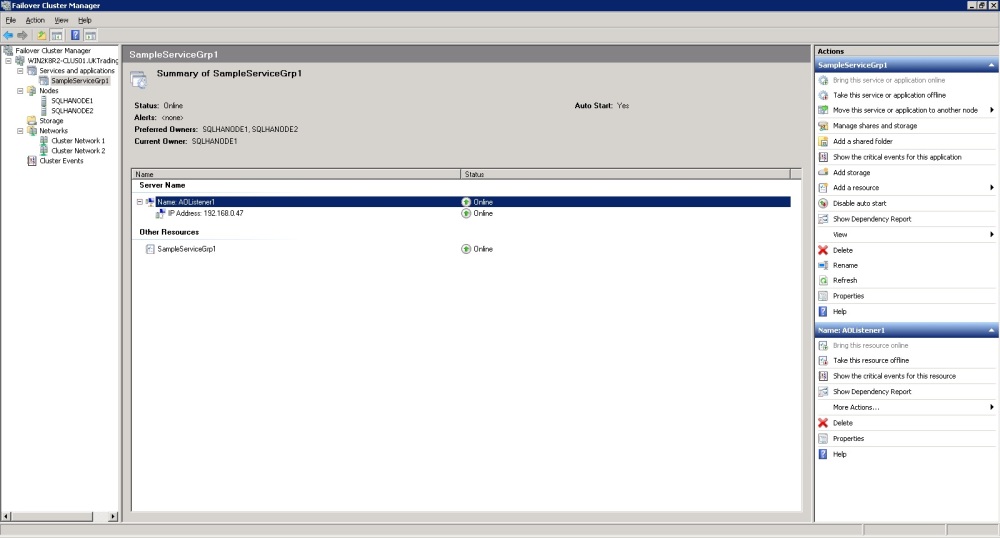
Checking Failover Cluster manager we now see the service and its resources created to support the AlwaysOn Availability group. Upon failover of the primary, the cluster group\application moves to the new primary instances node.
AlwaysOn availability groups offer a range of possibilities not only to provide redundancy but for offloading backup and reporting I\O too. As always, plan carefully for your requirements and implement the correct solution first time. Building out to test systems not only verifies your configuration but helps you to prepare for your Live deployment.
 Subscribe